Okay, Joshua, thanks. I am examining the version 32 of the jupyter notebook, hoping the “hack” steps confirm my expectations on the detailed steps to successfully get through these steps. So, at this time I may hit the “pause” button in anticipation of your newer version.
Since I’m still a newbie, the hopes that the tutorial runs clean helps me a lot, while, if it has a few hiccups, THAT also helps me learn. So, again, thanks for your help.
I’ll watch for your updates.
Fred, Dallas, Tx
PS - are you up in Glascow area?
You shouldn’t need to re-install the pipeline from scratch in order to install a new version.
thank you, I did understand that I would not have to re-install the full pipeline…
Oh you are entirely correct, I was not reading closely enough and didn’t process the “discrete” part, only internalizing the make a skymap part. Yes you need calexps for that.
You may consider using the register-symap command with a config file so you can define the skymap upfront and run the pipeline end-to-end. There is not much of a difference for this particular case, but it can be nice to run things in a similar manor to when you are using an existing butler. For instance you would not re-run the discrete command on any subsequent reprocessings of the same data.
Having the skymaps defined ahead allows you to do things such as saying “run this pipeline for tract 10 patch 20” It will figure out what raws will be needed to complete that request and generate a restricted execution graph. Like I said this wont make much of a difference for what you are running, but if you took the same commands written above and attempted to run on a butler with HSC DR2, it would attempt to process ALL the raws it found (which may be indeed what you want).
So it really depends on what you want to get out of what you are doing now. Is it something for people doing quick processing on their laptops, or something to get familiar with commands they can then use elsewhere. If the later, it would be helpful to have things split up into “here is how to setup a mock butler” step, and a “process some data” step.
If you are interested in a skymap config file, you can look at the one we use here, and of course continue to ask questions and we can help.
1 Like
It is safest to always use the appropriate newinstall.sh, but in many cases that file has not changed, and no new installation is required. Messages will be posted on Community (e.g. Deploying rubin-env 0.7.0) when a new version appears.
1 Like
Okay, Joshua, I’m back to where I was 11 days ago. I’m at the tutorial “Hack” step again:
Importing the refcats into the butler repository:
++++++++++++++++++++++++++++++++++++++++++++++++++++++++++++
- I used a hack to get the refcats into this butler repository
- I used the butler convert command line task to convert the gen 2 repository (LSST Science pipeline tutorial) to a gen 3 repository
- Then I used the butler import command link task to import into the new butler repository (GEN3_run)
-
Question - Is there a way of ingestiing the refcats in a gen 3 format ??
+++++++++++++++++++++++++++++++++++++++++++++++++++++++++++++
I have successfully completed the butler convert command. However, while I totally do not understand the need to perform a butler import, the import command fails, not finding the .yaml file.
- If I’ve already converted the DB to a gen3 version, do I have to do a fresh export so that I can THEN do a import to my Gen3 system?
- If I DO have to perform a fresh export, do I have to export everything, raws, calibrations, reference cat., etc…
- If another developer really owns these answers, I appreciate any/all help. Perhaps I need to stand back until the tutorial can work.
This is all being done by @parejkoj (see my comment above).
The current plan is to rewrite refcat creation such that it is independent of butler. It will create the files as normal and also create an index file. Then we would just run butler ingest-files on the converted files with that index.
There is also an open ticket for writing a little helper function that will just do the refcat part of gen2to3 conversion and bypass the export/import step.
If you are going down the route of converting a gen2 repo to gen3 solely for refcat (and then abandoning it) you would have to export the refcats from this new gen3 repo to get the export yaml file that you would then use for the later import to the new repo.
You can though use the converted repo as a starting point and use that. The tutorial steps should still work since you can still import the data you want for it and register any new instruments (if needed). Gen3 can support multiple instruments (unlike gen2) and also has a more flexible collection management system.
Okay, Tim, thanks for the affirmation. It tells me my thinking is on the right track.
- I have done the convert from gen2 to gen3.
- I have to perform an export of the refcats [this will create a exports.yaml file] .
- I then have to perform an import [referencing the exports.yaml created in step 2.]
- Then continue with ingesting, defining visits, etc…and other steps.
Hopefully, somehow, I’m staying on the right track here.
Can you advise the CLI for the export step? , or, should I attempt something like in python:
export.saveDatasets(butler.registry.queryDatasets(collections=‘refcats’,
** datasetType=‘ps1_pv3_3pi_20170110’))**
Many thanks,
Fred, Dallas, Tx
Yes. There is no butler export command at the moment because the user interface can be very general.
See though something like:
and you can see that you are pretty close. There is the with butler.export and then the saveDatasets – saving refcats collection might also be a good idea if you haven’t made it already.
okay, good. I enjoy jupyter better, even though I’ve been doing unix work for a long time.
thanks, I’ll keep chiseling away…
thanks again Joshua, all your posts are very helpful.
I’ve worked my way through pass #3 attempt at running the GEN3 pipeline. I’ve reached the ProcessCcd step and had to pause. The ONLY step I’m still not happy with is the “hack” to get a reference catalog properly added to the new repository.
So, if your next version, can you articulate the steps you took to get your ref catalog established.
I can see all the steps, but it seems like a lot of effort just to get the refcat set up. I don’t believe I’m the only person with the same questions.
I’m continuing with getting an export/import done, but still not happy with this “hack”.
Fred klich
On a common sense note, is it possible that someone has a .sqlite3 file that is the PanStarr refcat that can be easily added to the GEN3 repository [since it should be same for most of us newbie tutorial workers] that can be shared for the community. At least we can get by this hack step and get back into the heart of the GEN3 pipeline.
Fred , Dallas, Tx
No-one is happy with the hack. We are actively working on fixing this as has been mentioned multiple times in the discussion above.
butler does not use sqlite databases for the refcat file format. We shard the catalog spatially so that the required subset for a particular visit is efficiently accessible.
I understand. I believe I know my steps through the ref catalog part…I’ll restart and probably break into daylight here…but still learning a lot.
I started GEN3 regarding it as a pipeline “tutorial”, per it’s title. I now understand it is a prototype WIP. And, to be truthful, I kinda like it that way better.
Thanks for your help Tim.
Tim, do I need any special status to be able to fully navigate Jira?
It’s more than a prototype. The refcat bit is the only part that is problematic since it needs a gen2 repo to bootstrap it. It’s all evolving rapidly but it does work.
All DM tickets are public read-only. You need to be a project member to be able to modify tickets. There is a public RSS feed and you should be able to bookmark a query if there are specific types of tickets you want to see progress on.
Hi, Here is my latest GEN 3 tutorial run, where I have used the correct method to remove the “BRIGHT_OBJECT” that @natelust suggested in an earlier post. Instead of the hack in the prior tutorial
Gen3 run-w_2021_34.html (1.2 MB)
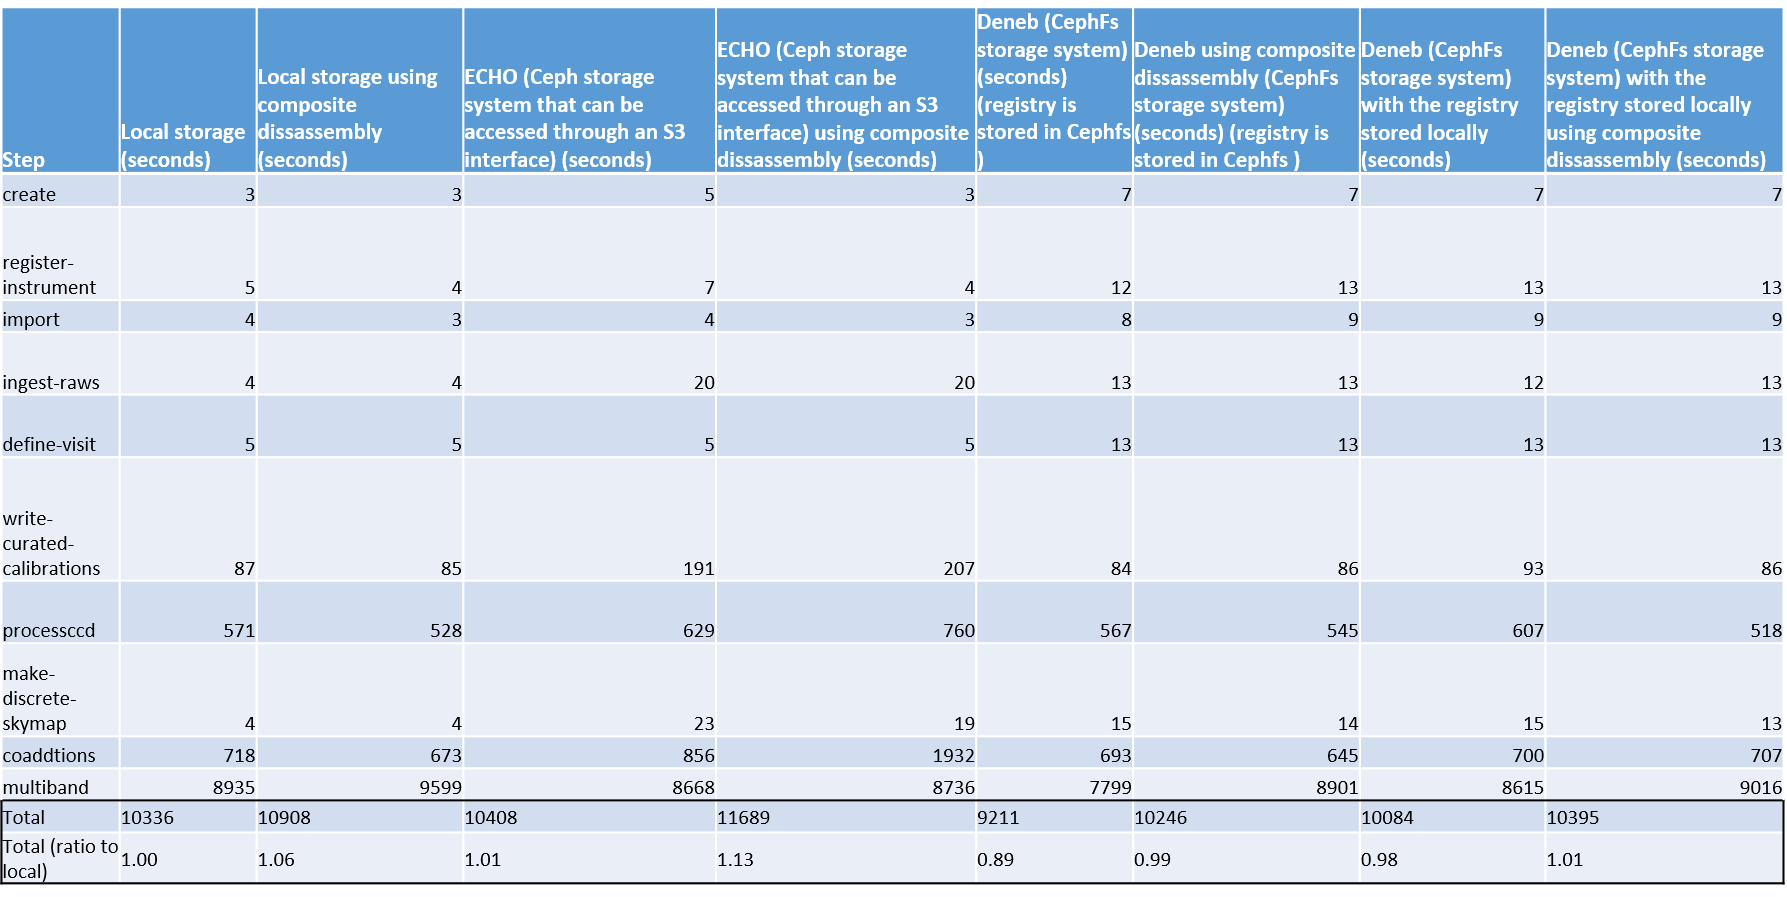
- I have redone the timing test using the latest version of my GEN 3 tutorial. This latest version uses 8 processes for the processccd, coaddtions and multiband stage.
-
I also did CPU, MEM and IO (disk and network) profiling on each of these steps, if you want to see how I did the profiling click here (GitHub - joshuadkitenge/LSST-RAL-ECHO-EXP ).
-
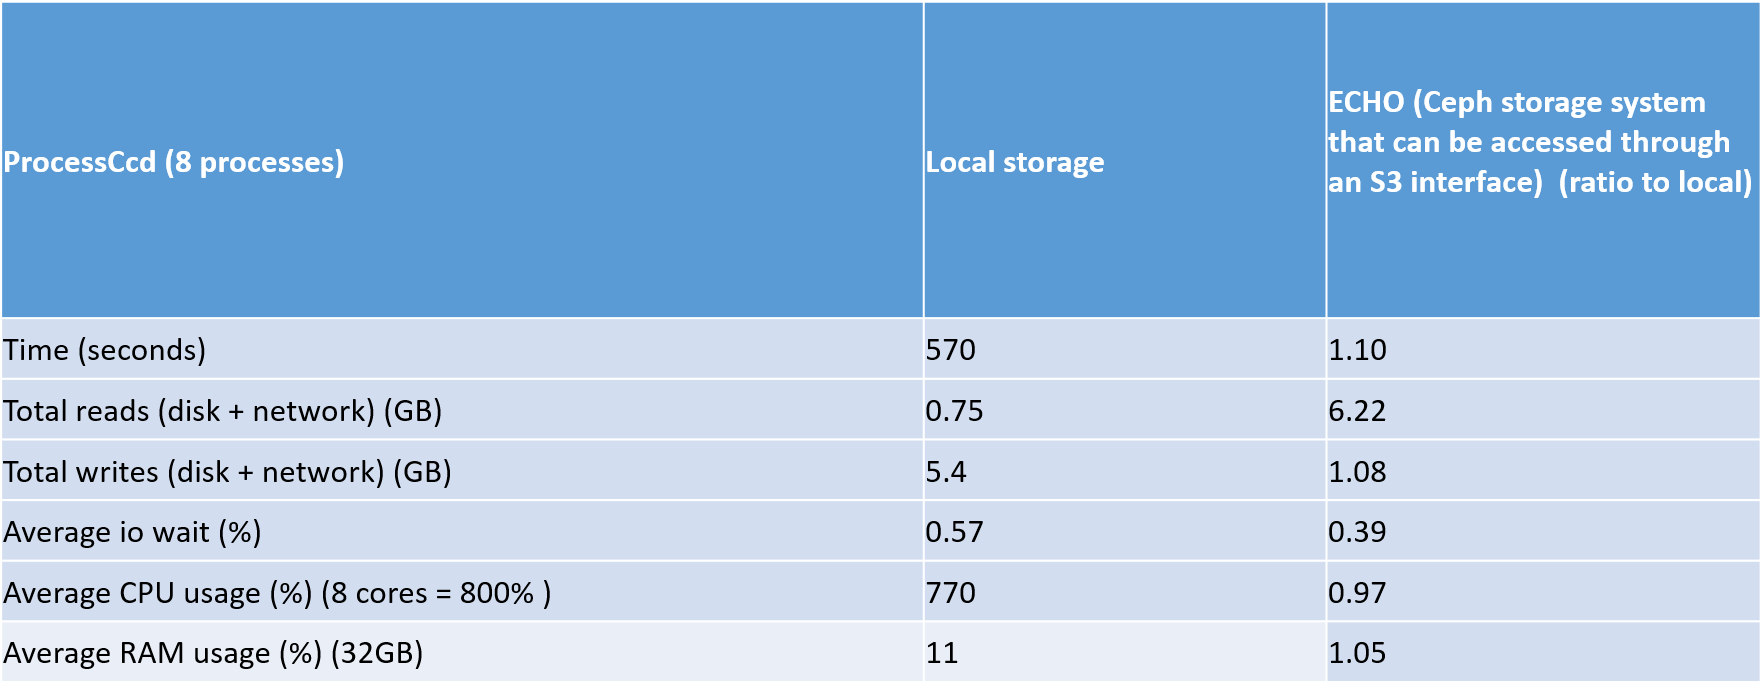
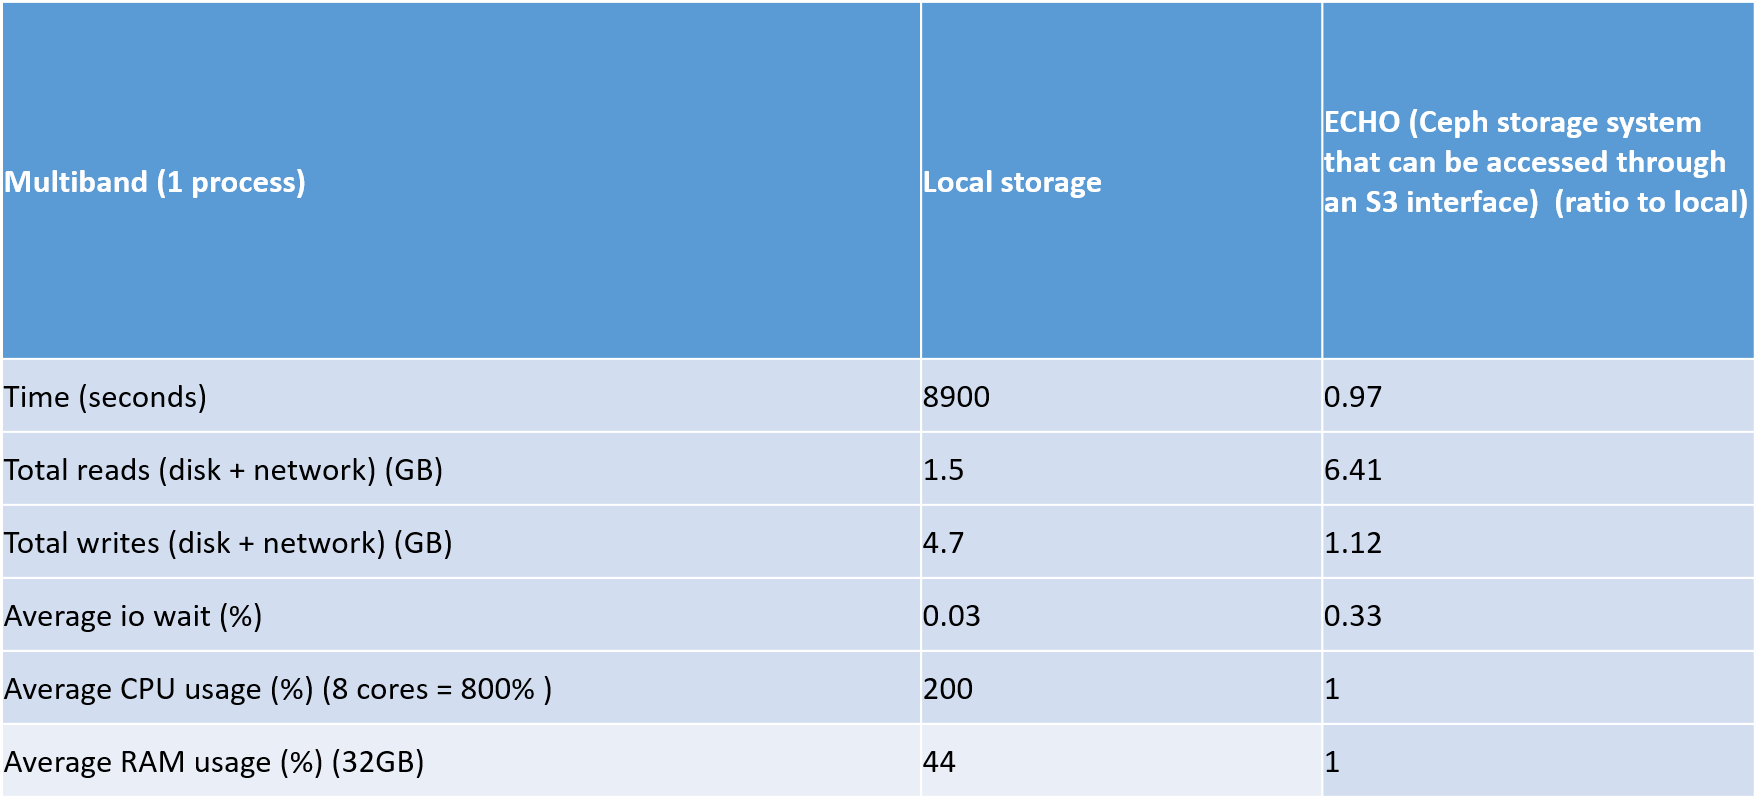
The most interesting aspect of this test is how local storage will compared to ECHO storage for the multiband , processccd and coaddtions steps. Look below for the relevant tables

-
The most interesting results of this test was the ratio of the total reads for local storage compared to ECHO. This ratio was really high, especially in the coaddtions step.
-
Another interesting aspect of this test is that the mulitband step seems to be bottlenecked as the mean CPU usage is 200% (800%= 8 processes) and also the average memory usage in this step is fairly high at 14 GB.
-
The overall timing differences between ECHO and local is only 1% but I think that is because most of the processing time is done in the multiband step
-
The main question I have about all the results that I have got from my testing, is that would you have expected these results ? Or is there some weirdness happening
Can you say the commands you are running for this test?
I have realized that composite disassembly uses much more disk space because the code path writing the FITS files does not have FITS file compression enabled. I will try to take a look at that in the near future.
Depending on whether local temp directories are included in these numbers you might see at least twice the writes because for object stores we generally write the file to local disk first and then push that file to the object store (which means one extra write and one extra read on the client). The object store will only see the one write though. When we get from the object store we will write the file locally and then read it. None of this really explains even the first set of numbers for process CCD where you get 6x read but only 1x write. In fact your writes are almost the same as before but your reads are 6x, 49x, 6x…
I have just finished the object store caching code (it’s here but is being reviewed) but I don’t know enough about the coaddition step to be sure if this would help at all. 49x seems too large. @natelust is coaddition doing anything interesting with repeated access to data (especially components)?
1 Like
The butler commands and pipetask I’m using are similar to the ones used in this script (just with different endpoint storages and configs )LSST-RAL-ECHO-EXP/GEN3_run.sh at master · joshuadkitenge/LSST-RAL-ECHO-EXP · GitHub
The profiling commands I used was:
- ps for CPU and RAM
- iostat for the disk profiling
- IFDATA for the network profiling